Sourdough Love, How to Get Started
Sourdough Love, How to Get Started

Take the Plunge
I have always wanted to make sourdough bread and yeast breads. For some reason, yeast and bread making has always scared the bejesus out of me. So I kept putting if off. One day I finally decided to learn more about sourdough, sourdough starters and bread baking in general. I read, researched and re-read until I finally thought I was ready to take the plunge. I am so very glad I did. Why don’t you take the sourdough love plunge!
Bake, Bake, and Bake
I will admit that I have made a few “bricks” of bread, “hockey puck rolls” and a few “endeavors” even my dogs wouldn’t eat! That alone is an accomplishment because I have pugs, and they eat anything! Seriously, they do! I’m happy to say that that era of bricks of bread and hockey puck rolls has finally ended! With much trial and error, and lots and lots of baking, I can safely say that I can make an edible loaf of bread. Yippee!
Proofing Steps
Here is how I go about my baking process. When I’m ready to bake bread, rolls, scones or even pizza crust, the first thing I need to do is “proof” my starter. First Step: Take out the jar of starter and let it come to room temperature. Second Step: Stir the contents and dump half out into a zip lock baggie, seal the baggie and throw it away.*
Third, Fourth and Do it Again!
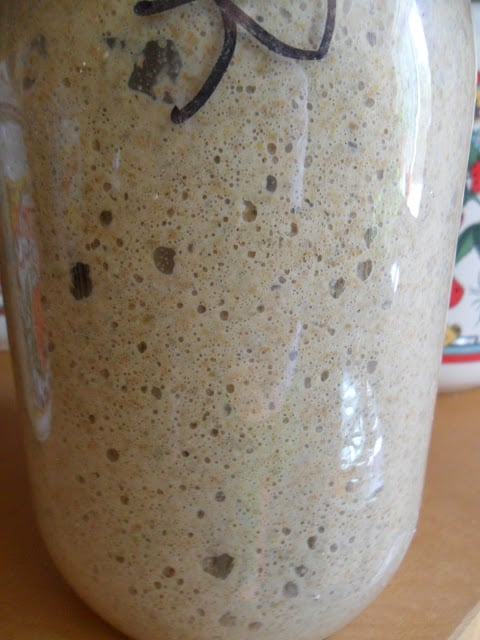
Third Step: Feed the contents in the jar with 1 cup flour and 1 cup room temperature bottled water. Stir well with a wooden spoon. I have a wooden spoon that I use only for my starter. Fourth Step: Cover the jar with gauze or cheesecloth. Let it sit on the counter top for 12 hours. (I use a clean, one quart canning jar.) Repeat the process again or until the starter is nice and bubbly. An active, ready to use starter will look like the image above.
UP NEXT: Pumpkin Ginger Chocolate Chip Muffins
A Brief History of Sourdough
Sourdough is thought to be the oldest form of leavened bread. Some think it was discovered as long ago as 4000 BC. when Egyptians accidentally left some dough out at room temperature and it picked up wild yeast from the air and began rising. Until commercially produced baking yeast became widely available in the mid to late 19th century, various forms of sourdough provided the primary method of leavening bread.
Gold Rush
Mention sourdough today and most people think of gold rushes, the prospectors in the California rush of 1849, the Klondike gold rush of 1898 and several that followed in Nome, Iditarod and Fairbanks, Alaska. Miners depended on their sourdough starters. As long as they had their starter and some flour, miners wouldn’t go hungry. The treasured starters were passed from person to person and some were even treated as family heirlooms.
Yeast in the Air
Many starters were passed from generation to generation, especially in Alaska. Sourdough works when its yeast, either wild organisms from the air or added commercial varieties, gives off carbon dioxide. This gas creates tiny bubbles in the dough, causing it to rise. The yeast fed starters feed on sugar in the dough and converts it to lactic acid. Starters feed from yeast found in the air will have a different sour flavor than sourdough made from yeast fed starters.
San Francisco Sourdough Bread
Some people say its the type of water used and some say its in the air. Perhaps the best known is the distinctively sour taste of San Francisco sourdough bread, which one bakery claims to have been making from the same starter since 1849. Some swear that San Francisco Sourdough gets it’s unique sour flavor from the air. Today, you can find sourdough bread on almost all menus, from fancy restaurants to fast food chains.

Traditional Sourdough Starter
Ingredients
- 2 cups room temperature water, preferably bottled spring water
- 2 cups all-purpose flour
Instructions
- Place ingredients in a glass bowl and blend well with a wooden spoon. Cover loosely with clean cheesecloth or clean towel. This allows air to enter the bowl so your starter can pick up wild yeasts from the environment. Place bowl it in a warm spot. Allow to sit 12 hours.
- Once a day, at roughly the same time, remove half the starter and throw it away. To the remaining starter, add 1 cup flour and 1 cup room temp. water; stir well until most of the lumps are gone. Cover with cheesecloth. Allow to sit 12 hours.
- After 3 to 4 days of replenishing the starter, it should be bubbly and have a pleasant sour smell. It is then ready to be used immediately or it can be placed in a clean, glass 1-quart canning jar with a loose fitting cover. Refrigerated for later use.
- Before using the from the refrigerator, the starter must be "proofed." To do this, take the starter out of the refrigerator several hours before you plan to use it. Allow the starter to come to room temp. Stir well and pour out half.
- Add 1 cup flour and 1 cup room temperature bottled water; stir well with wooden spoon. Cover loosely with cheesecloth and set it in a warm place to proof. The starter is ready to use when it becomes frothy and bubbly again and has a pleasant sour smell. This can take anywhere from 2 to 8 hours.
- Since proofing times vary so much, if you want to bake first thing in the morning, you should set your starter out to proof overnight. Proofing time varies on conditions also such as: house temperature, water and/or flour used, and hydration. Some people like their starters to be as thin as a crepe batter while others like a thicker pancake batter consistency.
*This recipe for Sourdough Oatmeal Bread is a great recipe to get you started on your sourdough journey. For more information on Sourdough, check out one of our favorite websites, Sourdough Home.
*For more Sourdough Information and Sourdough Fun check out; Start a Sourdough Starter Today.

